Release Notes > 5.41.0
Webiny 5.41.0 Changelog
See what's new in Webiny version 5.41.0.
 release on GitHub.
Breaking Changes❗
Updated Node.js to the Version 20
We have updated the Node.js version, which runs the code which gets deployed, to v20.
Users should update their development machines and CI deployments to use Node.js v20.
Node.js v22 is not supported as AWS Lambda runtime, so we did not go that far yet. As soon as AWS Lambda supports Node.js v22, we will update the runtime to that version, and users will get notified about it in the upgrade docs.
We have also updated the engines field in the package.json file to reflect this change.
Updated Typescript to the Version 4.9.5
We have updated the Typescript version to v4.9.5.
We also removed the typescript package from the package.json resolutions, so we are not forcing all the packages to use the same version.
If you notice any issues with your project because of that, feel free to add version 4.9.5 into the resolutions field in your package.json file.
Unfortunately, updating the Typescript to the v5+ is a bit problematic because we need to change our build process. It will probably be done for Webiny v5.42.0 release.
Multiple Roles and Teams Assignments - Changes on theIdentityInterface
With the introduction of the Multiple Roles and Teams Assignments (#4198), we’ve done the following changes to the Identity
groupproperty was deprecated, users should usegroupsinsteadteamproperty was deprecated, users should useteamsinstead
These changes were done because a Webiny user can now be assigned to multiple roles and teams. Which is also why the new properties accept an array of strings (instead of a single string, as it was before).
Note that the outlined changes are essentially only relevant for users who are using custom IdP implementations, like Okta or Auth0. This is because the Identity
group and team properties are only utilized in the context of custom IdP implementations. So, in case you’re using a custom IdP implementation, make sure to update your code accordingly. For updated code examples, revisit the Okta or Auth0 integration articles.
Note that if you continue using the old group and team properties, your code will still work. However, we recommend updating your code to use the new groups and teams properties, as the old properties will be removed in a future release.
Headless CMS
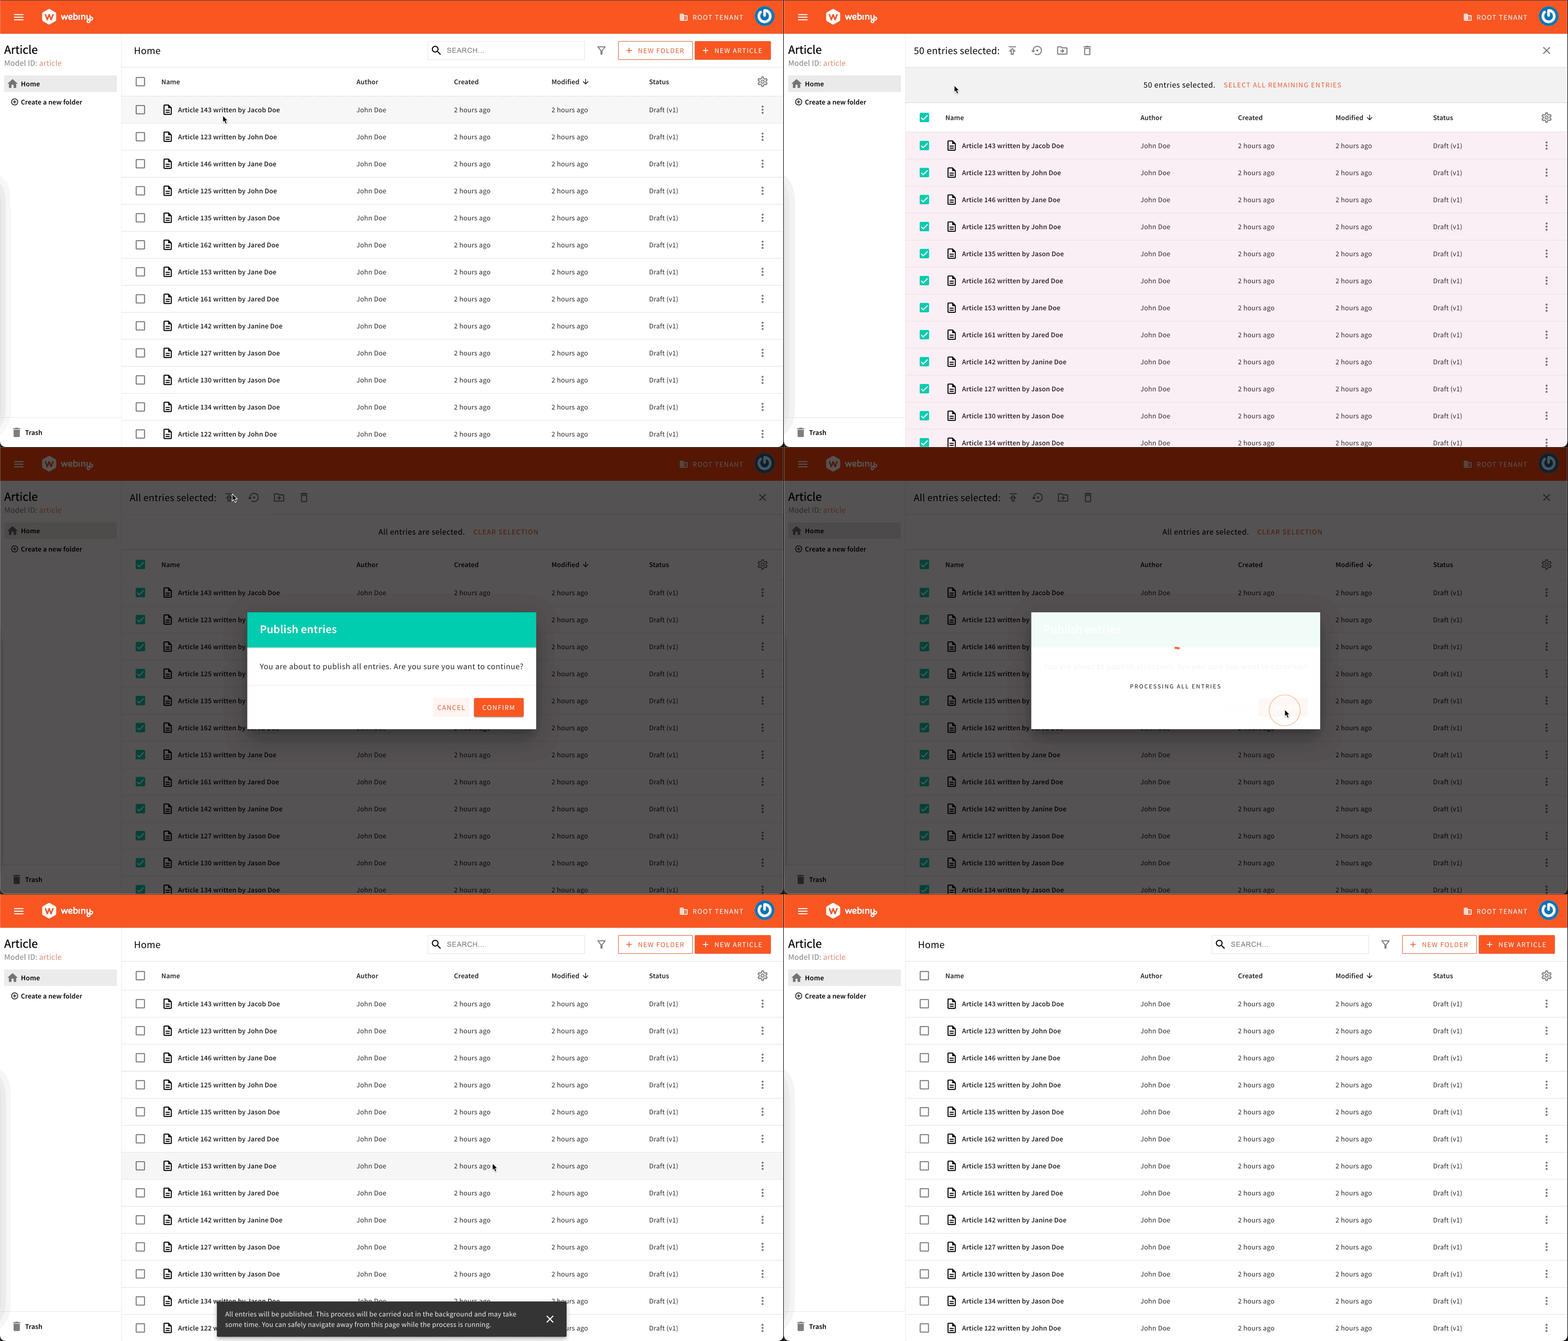
Enhance Bulk Actions With Background Tasks (#4112 )
)
We are excited to introduce a new enhancement in the Headless CMS: bulk actions handled through background tasks. This update streamlines large-scale content management processes, improving efficiency and providing a smoother user experience.
 Managing Entries With Bulk Actions Powered By Background Tasks
With this release, users can now perform the following bulk actions in the background without needing to process them in series on the client side:
- Publish entries
- Unpublish entries
- Move entries to a folder
- Move entries to the trash bin
- Restore entries from the trash bin
- Permanently delete entries
When a user selects all entries in the list, a new banner will appear, asking for confirmation to include all entries, including those that haven’t been loaded yet. The banner will also appear if the current folder contains child folders.
Upon confirmation, the bulk action is processed by a background task, bypassing the need for the client to handle it in-series.
At this stage, real-time status updates on background tasks are not supported. Users will need to manually refresh the page to see the current status of their tasks.
Breaking Change❗
When upgrading to version 5.41.X, it is crucial to review and update any custom bulk actions you have implemented. The new background task processing introduces changes that may impact how your bulk actions function, potentially causing unexpected behaviour if not updated.
To ensure compatibility, you need to either:
- Add a Bulk Action Task: Implement background task support. Detailed guidance is available in the documentation.
- Handle “Select All” Scenarios: If users select all entries in the current view, prevent the immediate execution of the bulk action by disabling the trigger. Use the
worker.isSelectedAllflag to check whether all entries are selected before proceeding.
Page Builder
Prerendering Service - AWS Lambda Timeouts (#4330 )
)
While prerendering a page that was just published, the Prerendering Service, or, more specifically, the AWS Lambda function that’s responsible for prerendering the page, would sometimes run into an AWS Lambda timeout, causing the prerendering process to fail.
One of the examples where this issue would occur is when a page contained one or more YouTube embeds.
With this release, we’ve done a thorough investigation and identified the root cause of the issue. And although the fix might not be ideal
We’ll be monitoring the situation closely, and if we see that the issue persists, we’ll be revisiting the code to come up with a more robust solution.
To learn more about the prerendering process Webiny’s Page Builder app users to prerender published pages, check out
the Prerendering Pages
Theme Manager - License Change
In the previous versions of Webiny, Webiny’s Theme Manager was part of the enterprise offering, which meant that users needed an enterprise license to use it. With this release, we’ve decided to move the Theme Manager to the business offering, which means that users no longer need an enterprise license to use it.
Security
Multiple Roles and Teams Assignments (#4198 )
)
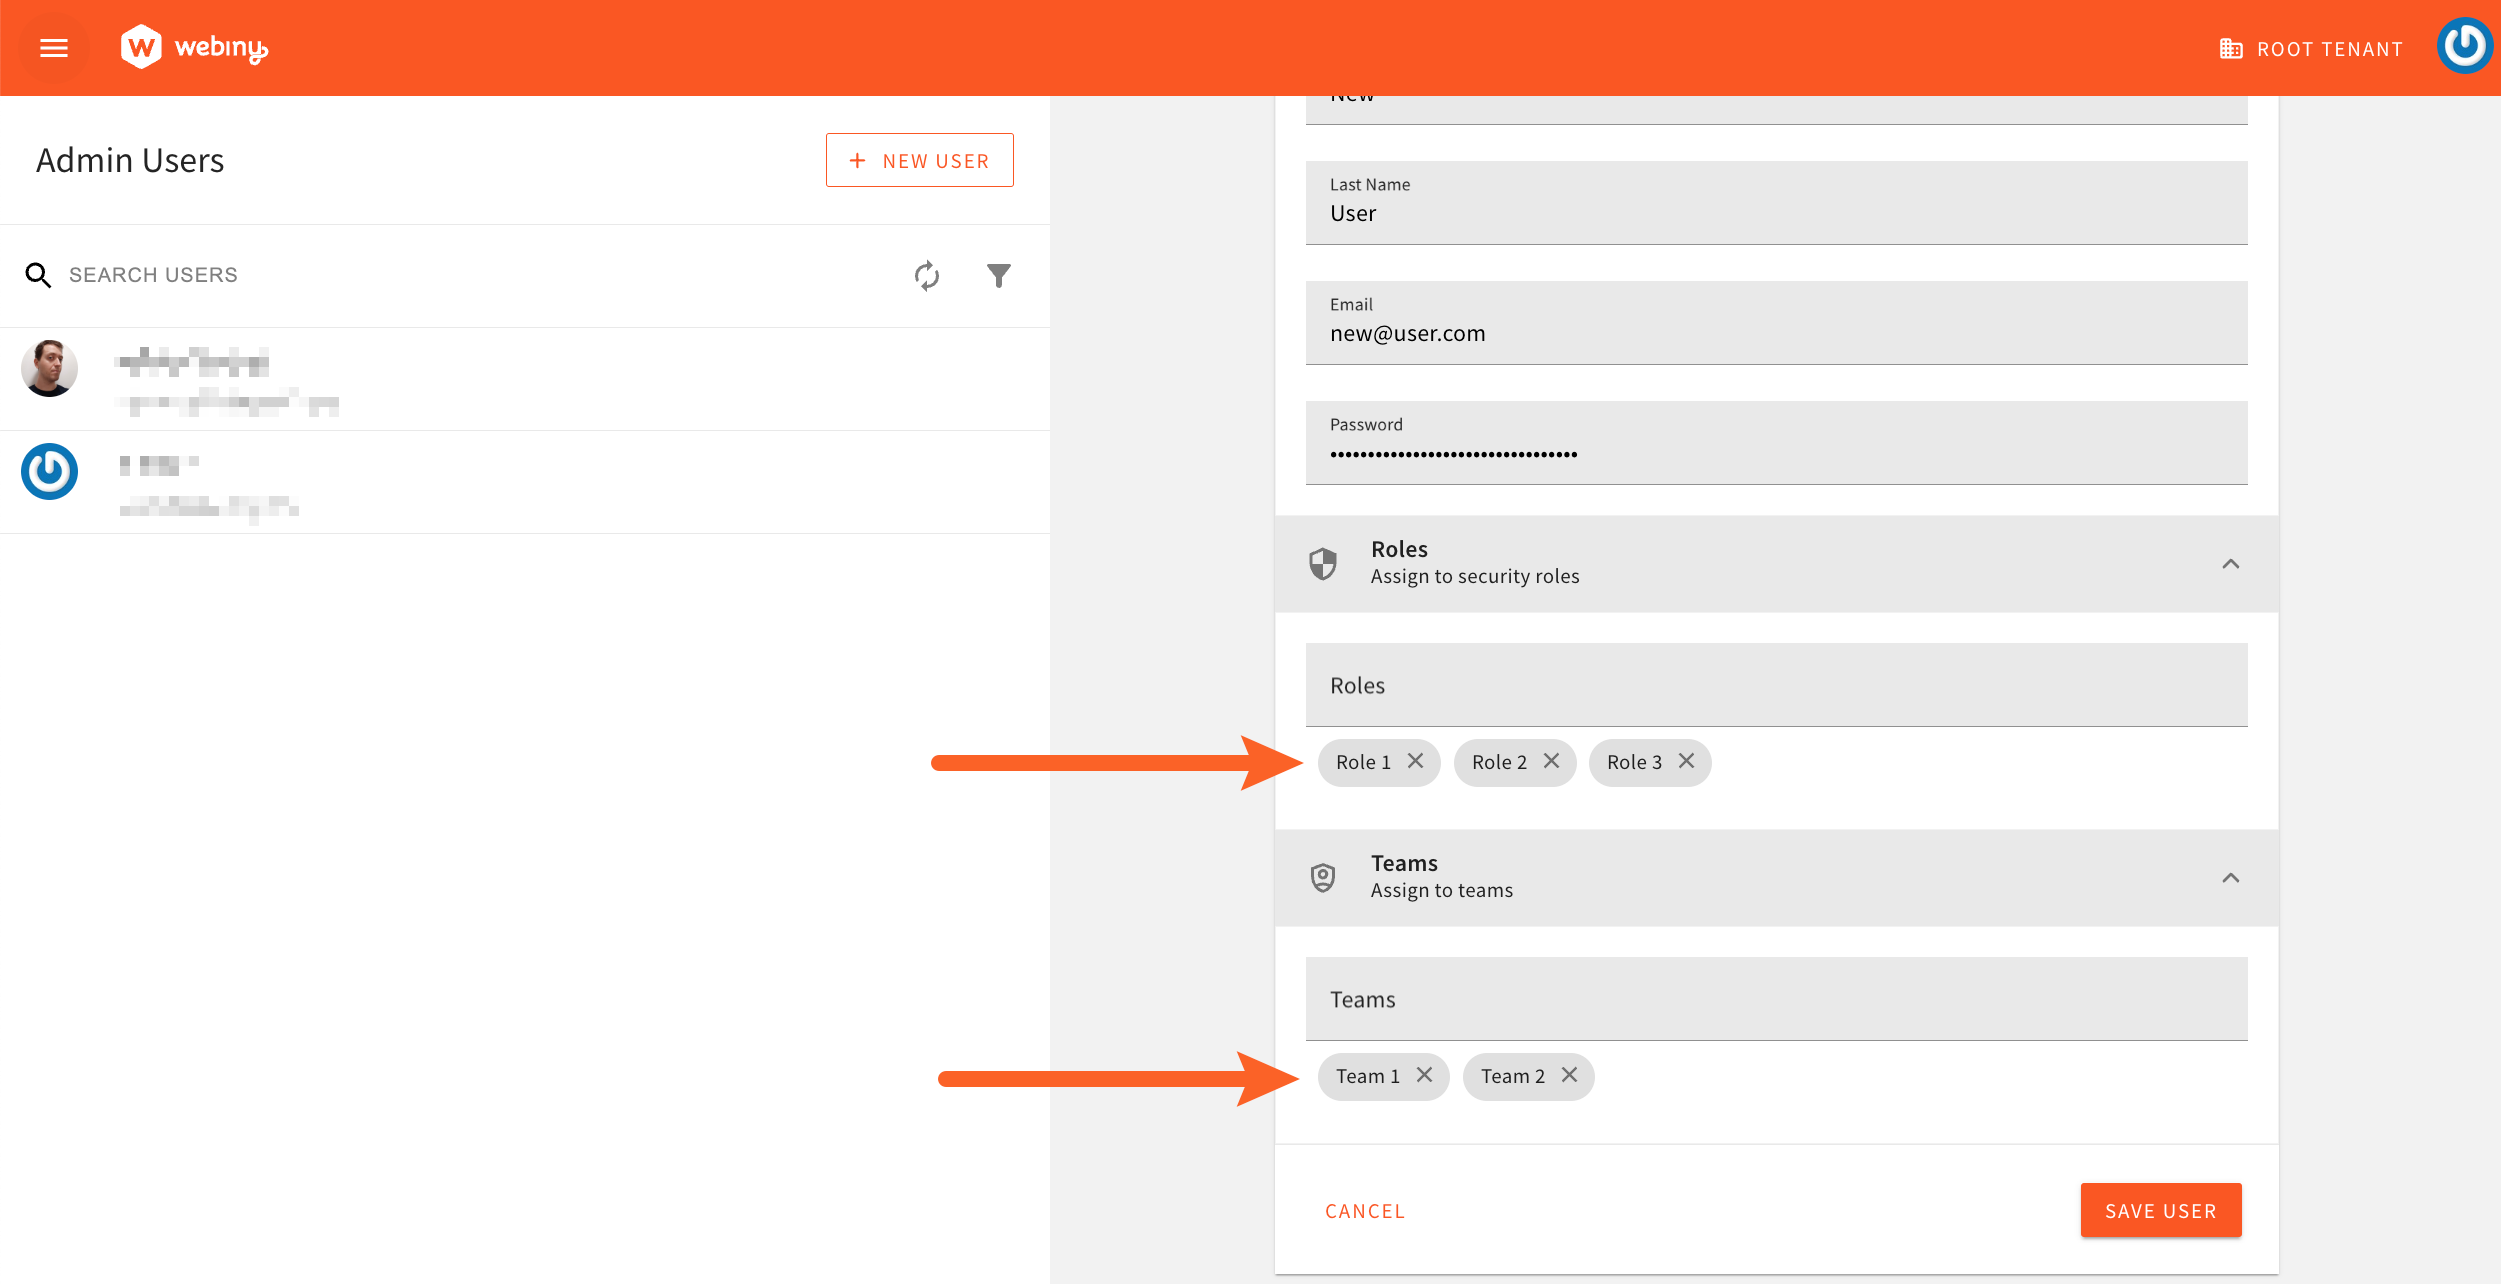
Prior to this release, Webiny users would only be able to possess one role, and also be assigned to one team. With this release, both of these limitations have been removed, and users can now be assigned to multiple teams, and possess multiple roles.
 Assigning Users To Multiple Teams
Note that the Teams feature is part of Webiny’s enterprise offering. To learn more, please check out the Teams article.
Programmatic Creation of Roles and Teams (#4303 )
)
With this release, we’ve added the ability to programmatically create roles and teams. This is especially useful when you need to create a large number of roles and teams, and you don’t want to do it manually.
To learn more, head over to the new Programmatically Create Roles and Teams article.
Copy Security Permissions Object (#4303 )
)
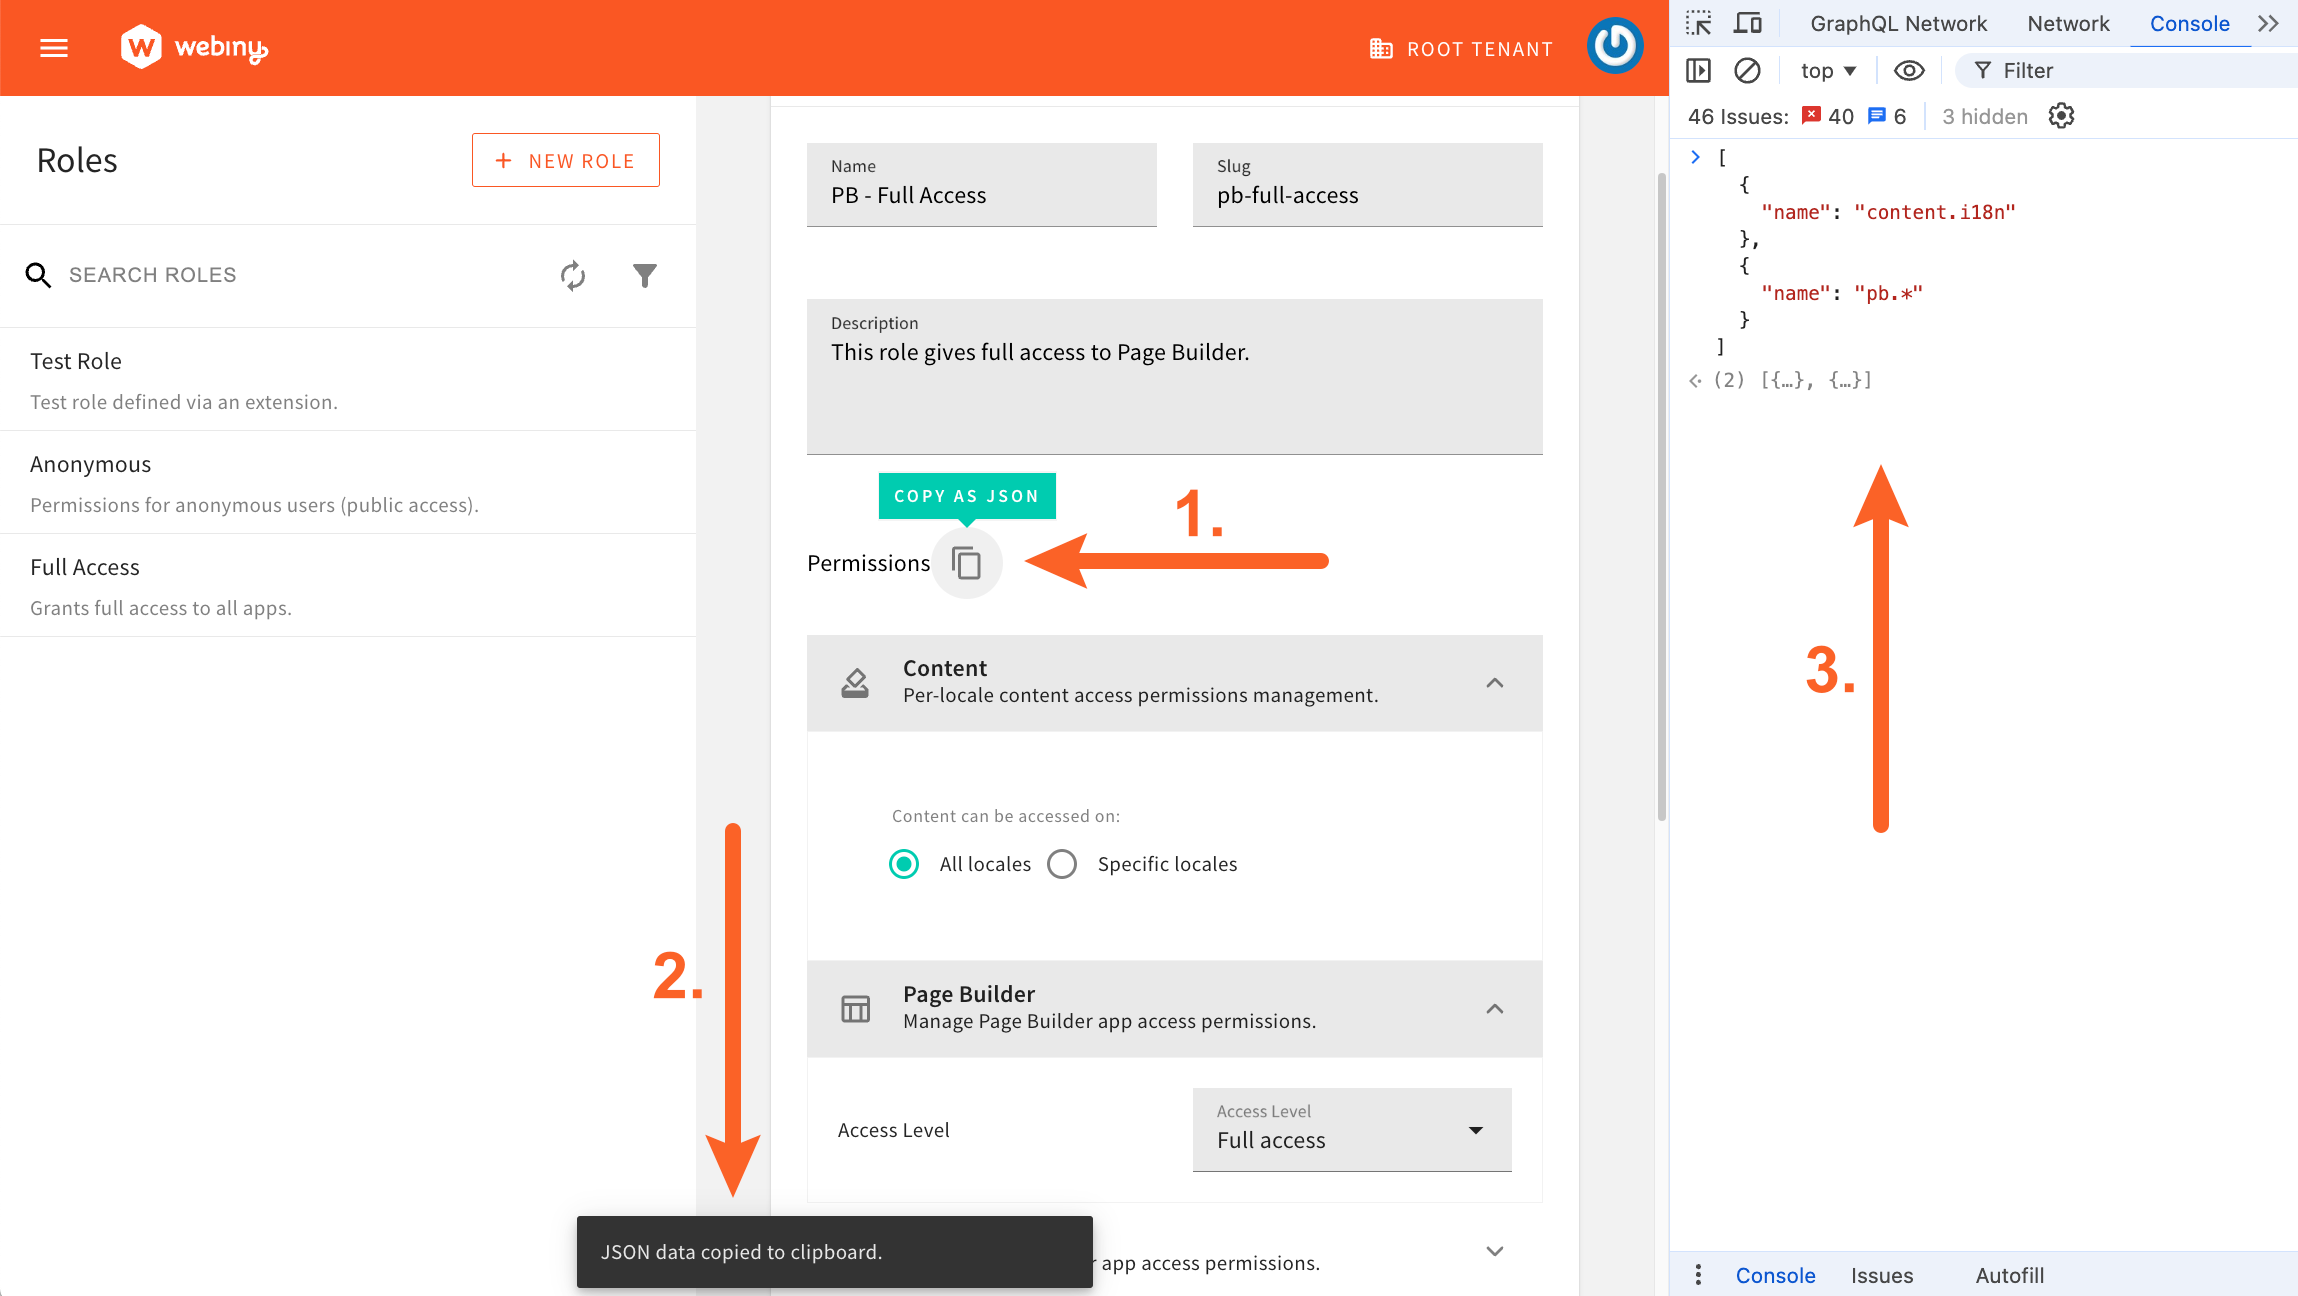
In order to make programmatic creation of roles and defining its permissions a bit easier, in the Roles and API Keys forms, we’ve introduced the “Copy as JSON” button. This button allows you to copy the entire security permissions object as a JSON string, which you can then use in your code.
 Copy Security Permissions
Development
Introducing the New Watch Command (Local AWS Lambda Development) (#4185 )
)
This is a beta feature, and we’re looking for feedback from the community. If you encounter any issues, please let us
know
From the early days, in order to perform both backend and frontend development, Webiny users would use the webiny watch command. And while this command works fine when it comes to frontend development (Admin, public website), we’ve come to a conclusion that it’s not the best solution for backend development.
One of the reasons is the fact that, whenever a backend code change is made, the code needs to redeployed to AWS Lambda, which can take anywhere from 5 seconds, up to a minute, and even more. This can be a real productivity killer, especially when you’re working on a feature that requires a lot of backend changes. Another reason is the inability to properly debug the backend code, as the webiny watch command doesn’t provide a way to debug the code running in AWS Lambda.
To address these issues, we’ve been experimenting with a new approach, which we like to call Local AWS Lambda Development, and which we’re introducing in this release as a beta feature.
Essentially, this new feature allows you to run your AWS Lambda code locally, without the need to continuously deploy changes to AWS. This means that, whenever you make a change to your backend code, you can immediately see the results, without the need to wait for the code to be deployed to AWS Lambda. And not only that, you can also debug your code, as the code is running in your local environment.
To give this new feature a try, you can add the following feature flag in your webiny.project.ts file:
Once that’s done, you’ll need to deploy your Core and API project applications, which can be done by running the following command:
Finally, after the deployment is finished, you can start the new watch command by running:
With all of these steps completed, you should be able to see the new watch command in action. To learn more, we’ve also created a new section in our existing watch command article, which explains how to use this new feature.
We hope you’ll find this new feature useful, and we’re looking forward to hearing your feedback!
The initial inspiration for building this feature came from Serverless Stack

Enterprise
Audit Logs - Now Working Properly With Multi-Theme Setup (#4318 )
)
Because of an internal code issue, in Webiny projects that were using multiple themes, the Audit Logs module in Admin Area would break. This issue has now been fixed, and Audit Logs are now working properly in multi-theme setups.
Note that the Audit Logs feature is part of Webiny’s enterprise offering. To learn more, please check out the Teams article.
In case you missed it, via the Theme Manager application, users can create multiple themes that are used to style websites created with the Page Builder application.
Deployments
Missing Permission in "Deploy Webiny Project" CloudFormation Template (#4323 )
)
In order to deploy a Webiny project in a more controlled and secure manner, users can utilize the Deploy Webiny Project AWS CloudFormation template. Via three IAM user groups, the template deploys necessary (least-privilege
With this release, we’ve addressed a couple of issues related to missing or incorrectly set permissions in the Deploy Webiny Project AWS CloudFormation template.
Learn more about the Deploy Webiny Project AWS CloudFormation template in our Configure AWS Credentials article.
Updated Pulumi Package Versions (#4323 )
)
We’ve updated the minimum required versions of Pulumi packages. The updated versions are as follows:
@pulumi/aws: bumped from
^6.48.0"to^6.55.0@pulumi/pulumi: bumped from
^3.128.0"to^3.136.1
As we can see, we’ve only bumped the patch versions of these packages, which means that there shouldn’t be any breaking changes. However, as a best practice, we recommend that you test your deployments in a non-production environment before deploying to production.
Webiny projects are deployed with Pulumi - a modern infrastructure as code (IaC) solution. Check out the Iac with Pulumi topic to learn more.
Elasticsearch and OpenSearch Shared Indexes (#4306 )
)
In this release we have added the ability to make Webiny share indexes via Pulumi configuration.
To find out more about shared indexes, please read this article.
To make Elasticsearch share indexes, you need to add the following configuration to your apps/core/webiny.aplication.ts file:
And to the apps/api/webiny.application.ts file:
To make Elasticsearch share indexes, you need to add the following configuration to your apps/core/webiny.aplication.ts file:
And to the apps/api/webiny.application.ts file:
You should NOT change the sharedIndexes configuration after the initial deployment. If you do, you will lose all
the data.
Other Improvements
Introducedrobots.txtfor Admin and Website Apps (#4329 )
)
For both Admin and Website apps, we’ve introduced the robots.txt file, which is now available in the following locations:
apps/admin/public/robots.txtapps/website/public/robots.txt
The robots.txt file is used to provide instructions to web robots (also known as web crawlers) about the pages that should be crawled or not crawled. By default, the robots.txt file is set to allow all web crawlers to crawl all pages for the Website app, and disallow all web crawlers from crawling all pages for the Admin app. In case of the Admin app, this is done to prevent search engines from indexing the Admin app pages.
For projects that are being upgraded from a previous version of Webiny, the robots.txt file will be automatically created during the upgrade process.
A Background Task Step Function Is Now Triggered via Direct AWS SDK Call (#4289 )
)
Prior to this version, a background task Step Function was triggered via an Event Bridge event. This caused problems when a background task had child tasks - sometimes child task failed but the parent did not know about it.
Now we have a reference to the child task and the parent can check if the child task is actually running.
It also allowed us to trigger a Step Function with a name - for easier debugging and referencing.